Revenue Collections
Introduction
Welcome to the New World ERP Revenue Collections Processing guide. This document will guide the user through both the setup and processing aspects of Revenue Collections Processing.
The guide is divided into two sections:
The System Administration Guide will focus on the setup components necessary to utilize Revenue Collections Processing within New World ERP. This will include detailed information on master files that must be set-up such as cash register and receipt set up and will also include the security settings which will be utilized to enable workflow and tailor user options to the user needs.
The End User Processing Guide will describe the steps, workflow and options available in Revenue Collections Processing to the end-user. It will guide the user through the process from receipt batch initialization to posting the batch. Included in the section will also be a guide to the standard reports available in the software.
This document is available in Microsoft Word format to allow for customization to the organization’s particular needs and procedures.
System Administration Guide
Company Suite Settings: Revenue Defaults
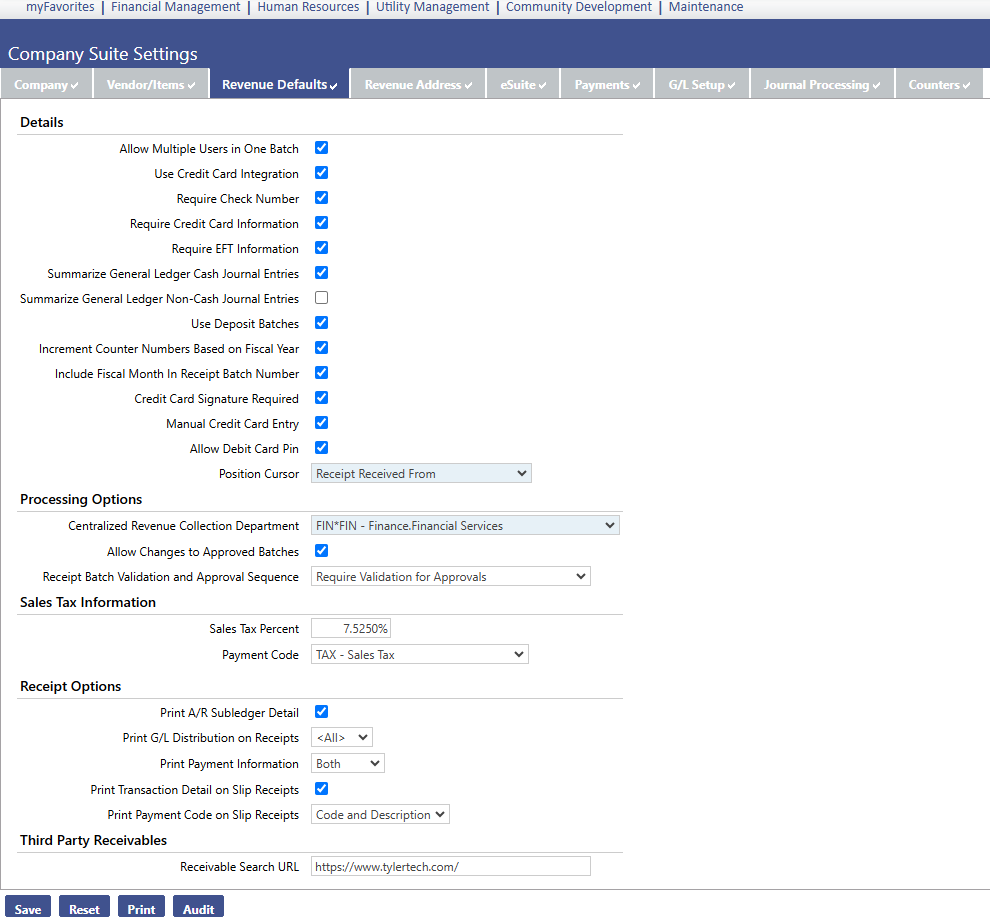
Allow Multiple Users in One Batch:
Checked: This will allow multiple cashiers to work in the same receipt batch at the same time.
Unchecked: This will not allow multiple users in a receipt batch at the same time.
Require Check Number:
Checked: This will require a check number to be entered anytime money is received via a check.
Unchecked: The check number will be optional.
Require Credit Card Information:
Checked: This will require the credit card type, card number, and expiration date to be entered when processing a receipt.
Unchecked: This will make credit card information optional when processing a receipt.
Summarize GL Debit JE:
Checked: This will summarize debit entries when creating receipt journal entries. Normally, all debit entries are hitting a generic cash account so the detail may not be needed.
Unchecked: Will provide detail debit entries for all receipt journals.
Summarize GL Credit JE:
Checked: This will summarize credit entries when creating receipt journal entries.
Unchecked: Will provide detail credit entries for all receipt journals. Users may want to see the credit detail information but not the debit detail.
Use Deposit Batches:
Checked: Will allow the use of deposit batch entry which allows for quick summarized receipt data entry.
Unchecked: Will prevent deposit batches from being created
Increment Counter # Based on Fiscal Year:
Checked: Updates the counter number when the fiscal year changes.
Unchecked: Updates the counter number when the calendar year changes.
Include Fiscal Month In Receipt Batch Number:
Checked: Will insert the fiscal month as the first 2 digits of receipt number, following the year.
Unchecked: Will not insert a fiscal month.
Position Cursor: Assign the default starting field for receipt entry
Processing Options
Centralized Revenue Collection Department: Will default this department as the responsible receipt batch department automatically when new receipt batches are generated.
Allow Changes to Approved Batches: Gives users the ability to add/edit/void receipts when in the approval stage.
Receipt Batch Validation and Approval Sequence: It is generally recommended to “Require Validation for Approvals,” this will perform a system validation check before the user gives the human approval. This depends on the user’s needs.
Sales Tax Options
Sales Tax Percent: Enter the sales tax percent, this can be applied to payment codes and will be calculated automatically when a payment code is selected that calculates sales tax.
Sales Tax Payment Code: When sales tax is auto calculated, it will go to the payment code defined in this field.
Receipt Options
A/R Sub-ledger: Includes A/R sub ledger detail on printed revenue receipts.
Print GL Distribution on Receipts: Gives the user the option to include the Credit G/L distribution on revenue receipts, All (Credits/Debits), or No G/L distribution.
Print Payment Information: Will print the type of payment received and the user can choose from summary info, detail info, or both.
Company Suite Settings: Revenue Address
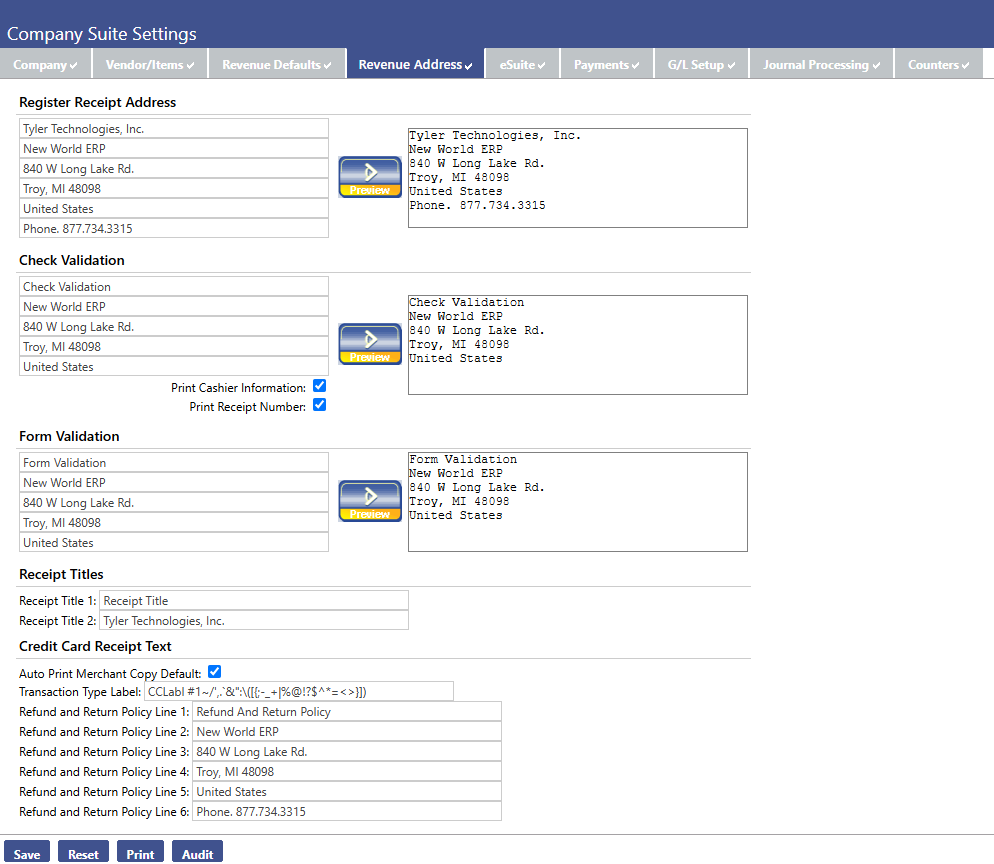
Register Receipt Address: This address will show on top of all the receipts that are generated.
Check Validation: Used if checks are validated by receipt slip printers. This will allow a user to feed the check through the slip printer, and it will print the check validation message on the check.
Form Validation: Used if forms are validated by receipt slip printers. This will allow a user to feed the form through the slip printer, and it will print the form validation message on the form.
Receipt Titles: This provides the ability to title receipts.
Validation Sets
|
Validation Set Number |
Validation Set Description |
Where Used |
Purpose |
Examples |
|||||
|---|---|---|---|---|---|---|---|---|---|
|
54 |
Payment Category |
Used to group payment codes. |
Assigns payment codes to a payment category. This is a required field and allows a user to run reports/inquiries of category information, and defines the deposit receipt groupings |
|
|||||
|
55 |
Collection Station Model |
Used to define Collection Stations. |
Not required, can be used to define types of collection stations |
|
|||||
|
56 |
Printer Model |
Used in maintenance. |
Not required, used with slip receipt printers. A user would enter slip receipt printer names in this validation set.
|
Printer’s name |
|||||
|
57 |
Receipt Form |
Used to generate receipts in batches. |
|
|
|||||
|
58 |
Cash Drawer Model |
Used if using a cash drawer. |
Not required, used if slip receipt printers are being used with a cash drawer |
|
|||||
|
60 |
Other Payment Type |
Used in a Counter Batch. |
Not required, allows a user to define other methods of payments accepted, if needed. The system will track cash, check, and credit card information, but any additional methods of payment will need to be defined in this validation set.
|
|
|||||
|
61 |
Credit Card Type |
Used in a Counter Batch. |
Defines types of credit cards accepted for tracking purposes. |
|
|||||
|
65 |
Import Lockbox Type |
Used in Lockbox functionality on Batch List Screen |
Defines lockbox import type if lockbox is being used. |
|
|||||
|
342 |
Void RC Receipt Reason |
Used inside receipt batches |
Defines reason for voiding and unvoiding receipt batches. |
|
|||||
Payment Code Set Up
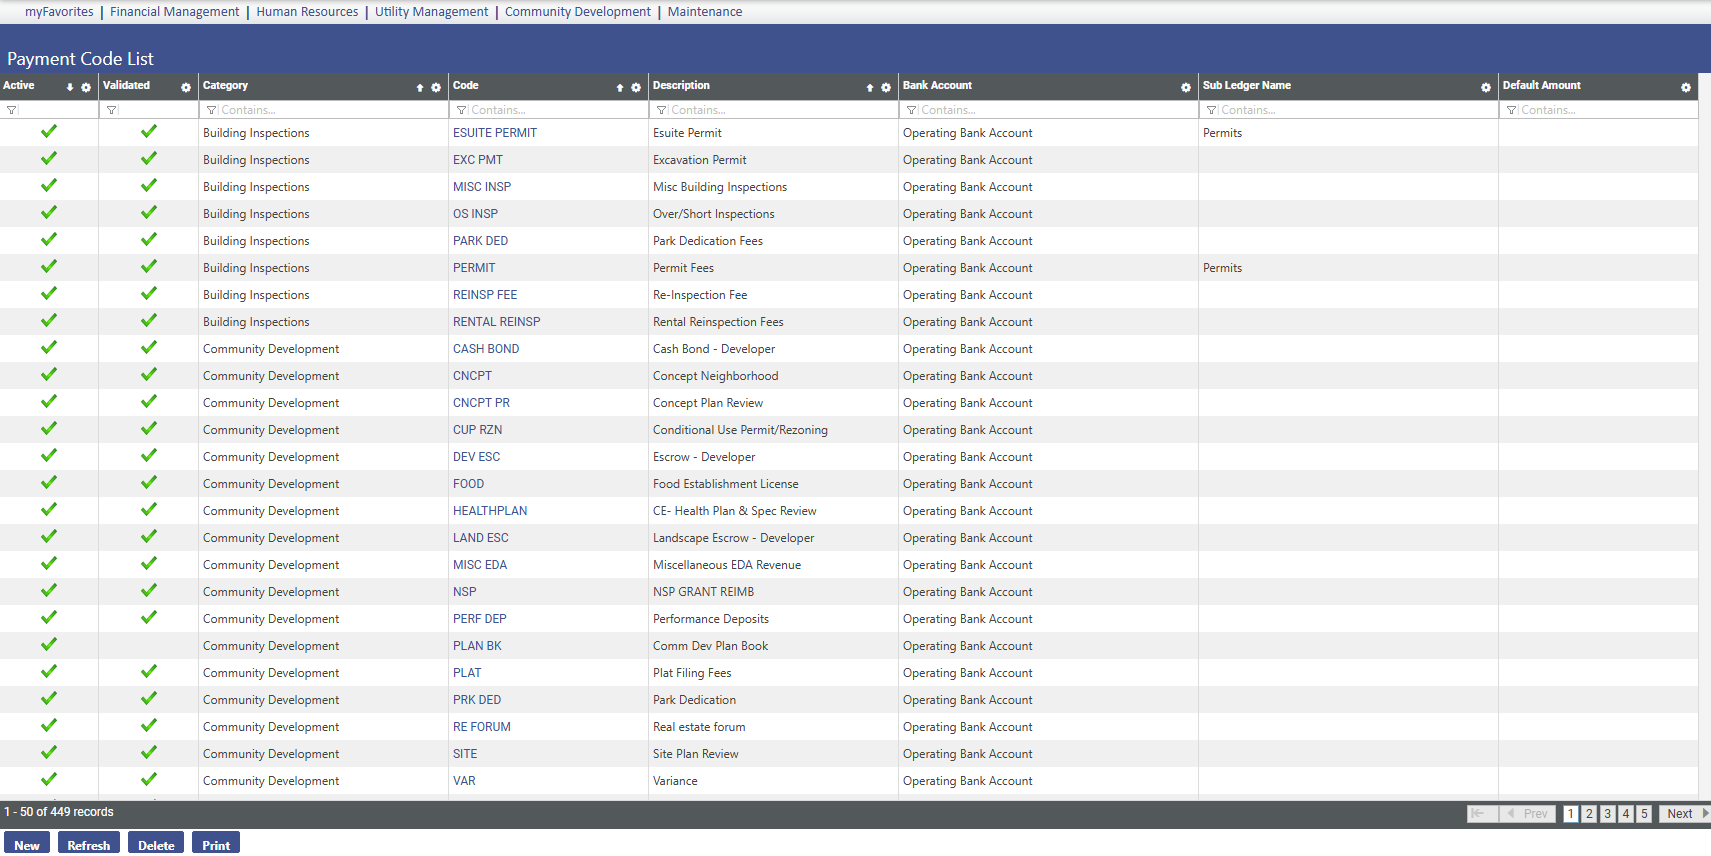
Payment codes were created to define types of revenue that will be received into New World ERP and allow quick and easy data entry/reporting. Normally, there is a payment code setup for every revenue account created.
New: Create a new payment code.
Delete: Highlight the payment code and hit the delete button. However, payment codes cannot be deleted if they have transactions that are already associated with it.
Refresh: Updates the Payment Code List screen.
Export: Allows the ability to export the payment code list.
Print: This sends payment codes and detail to “myReports”; it is very important to print the payment code list to verify that the codes were setup correctly upon entering them into New World ERP.
Payment Code General Tab
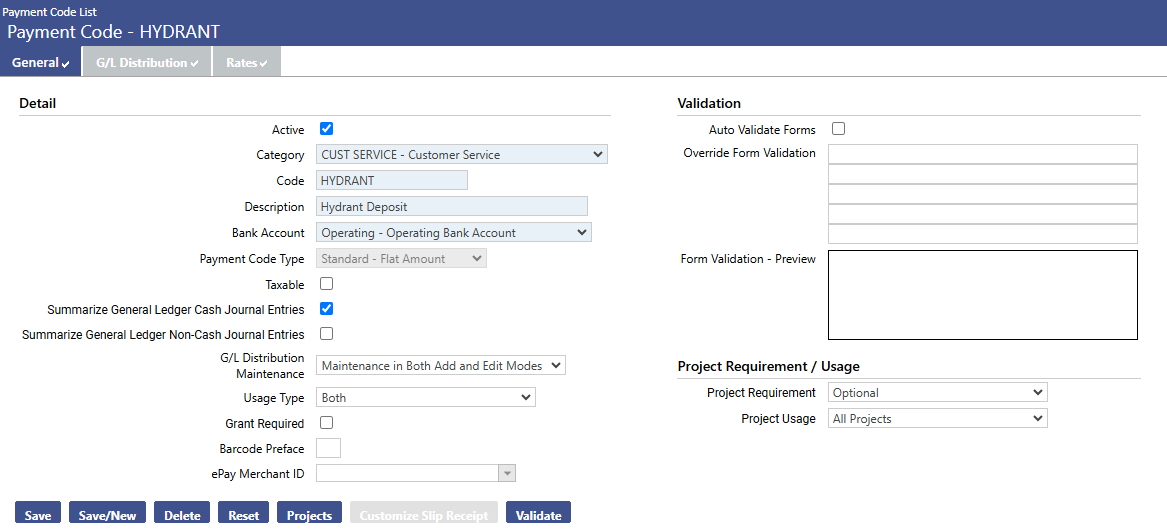
Active:
Checked: The payment code available for use.
Unchecked: The payment code no longer available for use.
Category: Used to group payment codes for reporting and deposit receipt entry. Required field pulling from validation set # 54 Payment Category.
Code: Create quick and easy reference codes to identify each payment code. Can use up to 16 characters; but remember to make this logical and easy to distinguish so it’s easy to find payment codes when entering receipts.
Description: Elaborate on the payment code to come up with a full description of the receipt being received. The description will show up after the code when entering receipts. Can retrieve a payment code by typing in part of the code or description, the system will find all payment codes created that match the user’s search criteria.
Bank Account: Assign the bank account being used to receipt money into. Will need to make sure all bank accounts have been setup, and assigned in user- based security.
Payment Code Type:
Standard – Variable Amount: This type will be used if the payment code is for revenue that requires different amounts. When this type is selected, the user will be required to enter an amount in for the receipt, when it is created.
Standard – Flat Amount: This type will be used if the payment code is for revenue that is always the same amount. When this type is selected, the amount will automatically populate in to the receipt when the code is selected for use.
Standard – Quantity Based: This type will be used if the payment code is for revenue that is based on different quantities.
New World Receivables: This type is used for revenue collections in tandem with the following modules Misc. Billing, Utility Mgmt, Licensing, Permitting, Project Planning. Must choose an A/R sub-ledger tied to one of the above.
A/R Sub-Ledger: Allows Misc. Billing, Utility Mgmt, Licensing, Permitting, Project Planning to interface with revenue collection so when the revenue comes in for a specific A/R sub ledger such as Miscellaneous Billing it will link to the MB module to update the invoice and the money being received against in both the MB module and Revenue Collection. Payment codes linked to these modules will be created when these modules are being trained.
Third Party Receivables: Assigned to all payment codes that will have 3rd party data being imported into them
Revenue Collection Legacy System: Assigned to all payment codes that will have Legacy System data being imported into them.
Default Amount: Can assign a default amount to a payment code which will always default in every time the payment code is selected. This is a useful tool if the receipt amount is going to be the same for the payment code.
Taxable:
Checked: Will automatically calculate tax on receipt amount every time this payment code is selected. Calculates based on the tax percent defined in the revenue default settings and the tax will hit the payment code designated as the Sales Tax Code also designated in the revenue default settings.
Unchecked: No sales tax will be calculated.
G/L Maintenance: Determines the editing capabilities allowed when putting receipts to a payment code
No Maintenance: Eliminates the ability for a user change the GL distribution on the payment code when entering receipts. This helps prevent wrong GL accounts from being hit and makes it easy for the user to enter receipts.
Maintenance and Edit only: Can change GL distribution before receipt is posted but not at the time of receipt entry.
Maintenance Add and Edit: Can change GL distribution debit/credit accounts at time of receipt entry.
Usage Type: Define if payment code can be used for standard receipting, deposit receipting, or both. Selecting “both” allows more flexibility when entering receipts, since it will be able to be used when entering Standard counter receipts and when entering summary deposit receipts.
Grant Required: Used to tie payment codes to grant activity in the grants module. When checked, a grant will need to be associated to the payment code. Whenever this payment code is used, it will then update that particular grants activity.
Barcode Preface: Enter a 2 letter code. This will be used when using barcodes on MB and UT.
Auto Validate Forms: Used in the Utilities module and will automatically validate utility forms if checked.
Override Form Validation: Can override form validation message setup on the revenue address tab to be unique for each payment code.
Project Requirement: In order for a payment code to be used for tracking project revenues, it needs to setup to allow project tracking. The payment code must have a Project Requirement of Optional, Recommended, or Required assigned to the payment code in order for it to show up as an available project payment code to select from. If the payment code is setup with Project Requirement of “Not Allowed” then it will not be available to assign to any projects.
Not Allowed: Does not allow project tracking.
Optional: Will allow a project to be selected at time of entry but it won’t be required.
Recommended: Will allow a project to be selected at time of receipt entry but it won’t be required. It will give the user a message “recommending” that they select a project.
Required: Will require a project to be selected every time the payment code is used.
Save: Saves current payment code information.
Save/New: Saves current payment code information and allows the user to create a new payment code.
Delete: Deletes payment code, but only if there aren’t any transactions tied to the payment code.
Reset: Resets the fields the user changed to the original values that were selected.
Projects: If the payment code is setup to allow project tracking, then the user can tie the payment code to the projects it will be used for.
Customize Slip Receipt: Allows for the customization of the slip receipt.
Validate: This is required in order for a payment code to be used in the system. Once a payment code has been validated by the system and saved, it will be available for use in receipts.
Payment Code GL Distribution Tab
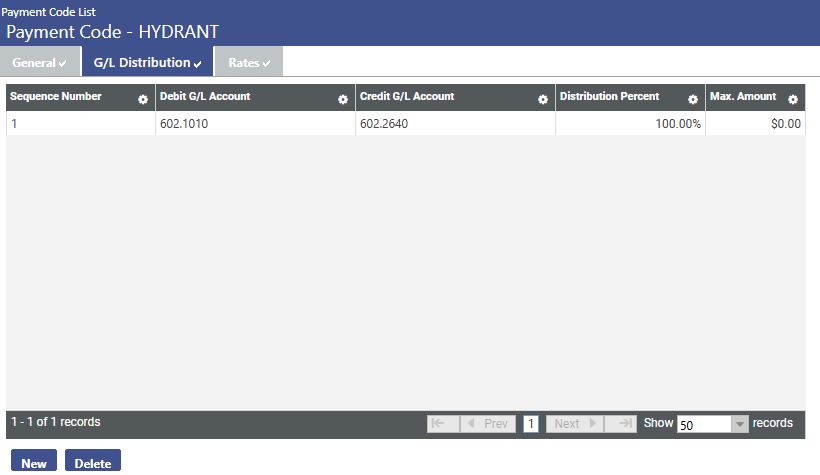
Hit the “New’ button to assign debit and credit accounts to the payment code. The user can have multiple debit/credit account for each payment code and the user must define the distribution percent for the GL accounts selected.
Payment Codes Rates Tab
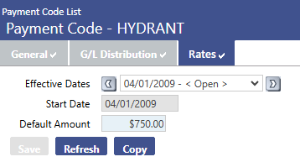
This screen is used strictly for creating rates on Standard - Quantity Based payment code type.
Here, the user can dictate a Max Quantity, a Flat Amount, and Variable Rate per Unit.
After the payment codes are created it is advised to print a listing of all the payment codes and review they were setup correctly. Keep the payment code listing report as a reference sheet as the user move into the revenue process training to be able to quickly lookup payment codes and to get familiar with the codes and descriptions that were set up.
Collection Station Set Up
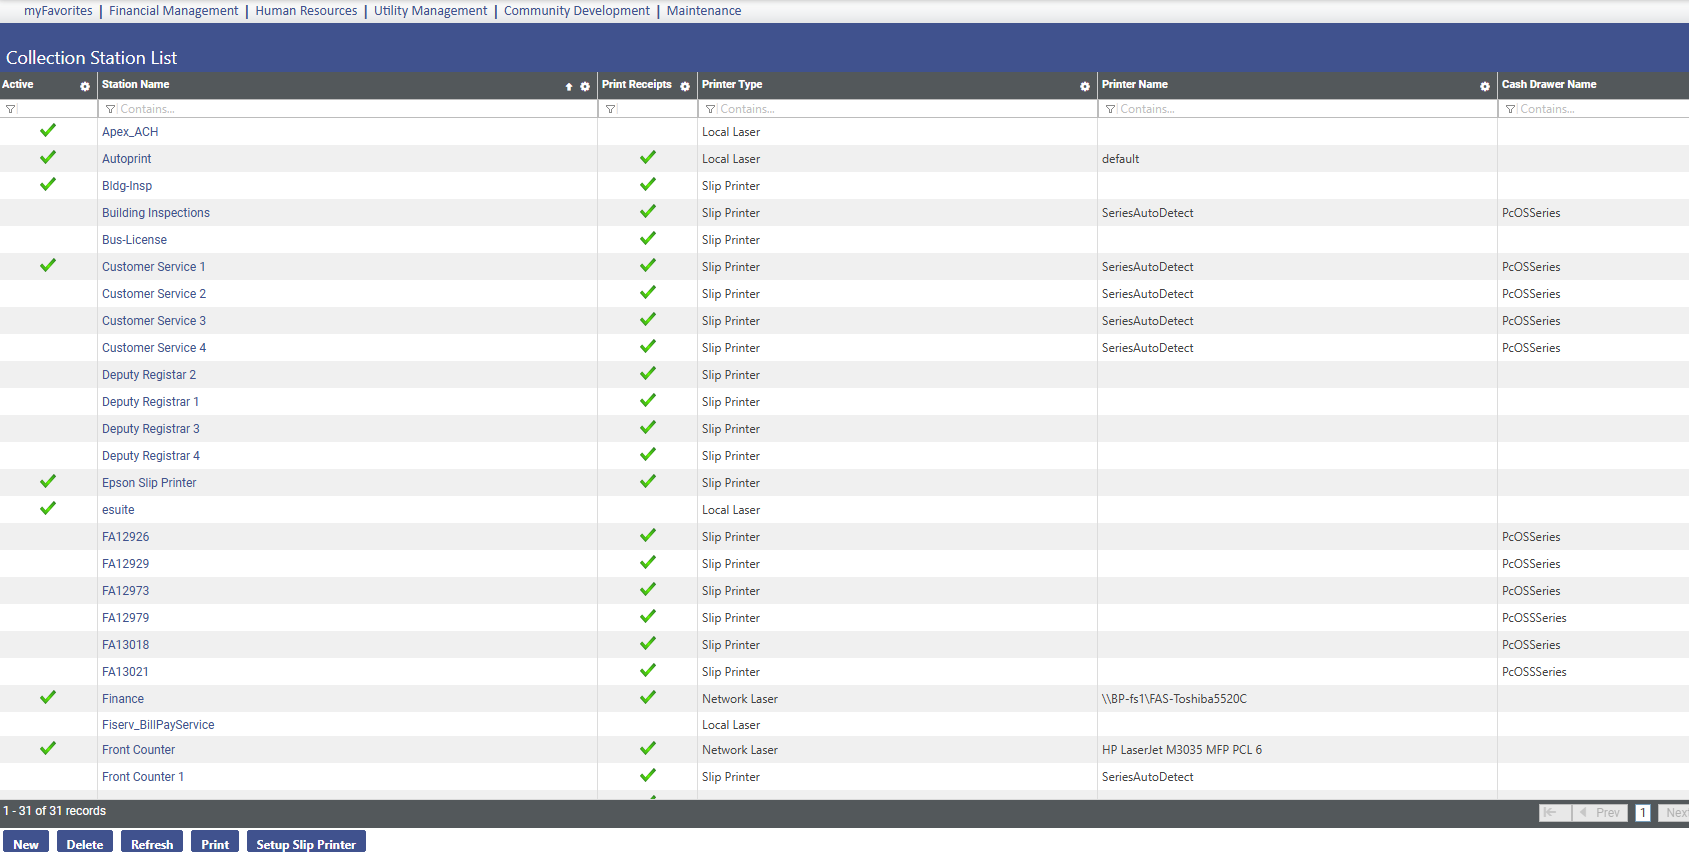
Collection Stations: This will setup collection stations to represent all computers that will be used to take in receipts. The user will assign collection stations to users through user based security. In order for a new receipt batch to be created, users will first have to assign what collection station is being used to take in the receipts.
New: This creates a new collection station.
Delete: This deletes a collection station.
Refresh: This updates the collection station screen.
Export: Allows the user to export the collection station information on the list page.
Print: Prints a listing of collection stations and sends the listing to “myReports.”
Setup Slip Printer: Runs a file to enable slip printers to interface with New World ERP.
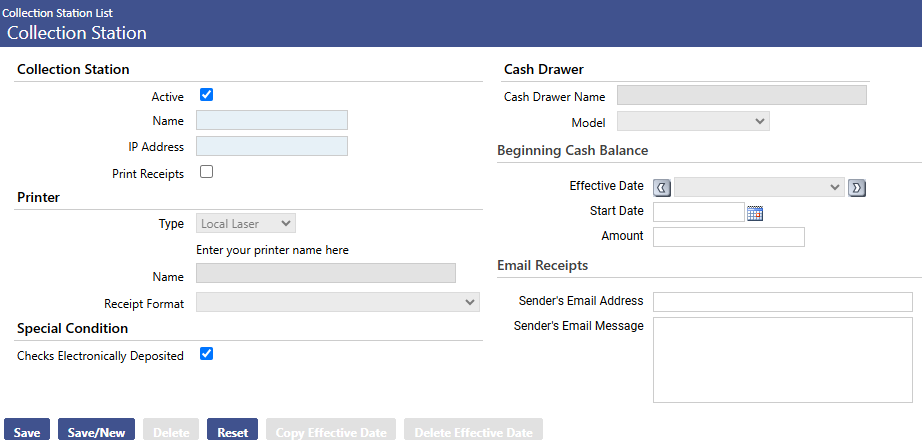
Collection Station
Active: Flag on or off to identify if collection station is currently active and in use.
Name: Enter the name of the collection station; this should define a naming convention to follow based off of the user name, department, or another unique identifier.
Examples: Kyle Spade, Recreation Dept, CS FIN001
IP Address: The user will need to enter the IP address for the computer being setup as the collection station.
Print Receipts: Check this box if this collection station will be printing receipts.
Printer
Type: Can select to print from a local laser printer, network laser printer, or cash receipt slip printer.
Name: Find the printer name for the local and network printers.
Receipt Format: Select the receipt format that will be used when this collection station prints receipts.
Default Validate Checks: This is only available when using cash receipt slip printers. This will require the user to put all checks thru the receipt printer to put a validation stamp on each check.
Cash Drawer
Cash Drawer Name: Enter the name of cash drawer.
Model: Select a drawer model.
Beginning Cash Balance
Effective Date: This is the effective date of the cash balance.
Start Date: This is the start date of the balance.
Amount: This is the amount of beginning balance.
Application Permissions
Application Permissions for Revenue Collections Processing can typically be completed effectively within one general template grouping called Revenue Collections Company Applications.
Permission Type – Company Applications
Feature Group –Revenue Collections
|
App |
Component |
Description |
All |
Add |
Change |
Delete |
View/Use |
|
|---|---|---|---|---|---|---|---|---|
|
FM |
Accounts Payable Print G/L Distribution Report
|
Provides the ability to spread the budget across months. This should only be activated if the budget is being spread. |
x |
|
|
|
|
x |
|
FM |
Import Revenue Collection Receipt
|
Ability to perform a revenue collections receipt import via CSV. |
x |
x |
|
|
|
|
|
FM |
Import Revenue Collection Receipt Audit Listing |
Ability to view the audit listing. |
x |
|
|
|
|
x |
|
FM |
Import Revenue Collection Receipt Edit Listing |
Ability to view the import edit listing. |
x |
|
|
|
|
x |
|
FM |
Revenue Collection Legacy Interface |
The ability to view the revenue collection legacy interface. |
x |
|
|
|
x |
|
|
FM |
Sales Tax G/L Distribution Summary |
The ability print the sales tax G/L distribution summary. |
x |
|
|
|
|
x |
|
FM |
Sales Tax Invoice |
The ability to use a sales tax invoice. |
x |
x |
x |
x |
x |
|
|
Suite |
Sales Tax Invoice Listing |
The ability to print a sales tax invoice listing. |
x |
|
|
|
|
x |
|
Suite |
Auditor Certificate |
The ability view an auditor certificate. |
x |
|
|
|
x |
|
|
Suite |
Receipt Batch Totals |
The ability to view receipt batch totals. |
x |
|
|
|
x |
|
|
Suite |
Receipt Distribution Listing |
The ability to print the receipt distribution listing. |
x |
|
|
|
|
x |
|
Suite |
Receipt Error Listing |
The ability to |
x |
|
|
|
|
x |
|
Suite |
Revenue Collection – Execute All Processes |
The ability to execute all processes within the revenue collection batch. |
x |
|
x |
|
|
|
|
Suite |
RC - Post |
The ability to post the revenue collection batch. |
x |
|
x |
|
|
|
|
Suite |
RC - Print |
The ability to print the revenue collection batch |
x |
|
|
|
|
x |
|
Suite |
RC – Validate
|
The ability to validate the revenue collection batch. |
x |
|
x |
|
|
|
|
Suite |
RC Analysis by Category |
The ability to view a revenue collection analysis by category. |
x |
|
|
|
x |
|
|
Suite |
RC Analysis by Year |
The ability to view a revenue collection analysis by year. |
x |
|
|
|
x |
|
|
Suite |
RC Bank Deposit Listing |
The ability to print a revenue collection bank deposit listing. |
x |
|
|
|
|
x |
|
Suite |
RC Batch
|
The ability to create and use a revenue collection batch. |
x |
x |
x |
x |
x |
|
|
Suite |
RC Edit and Post Listing
|
The ability to print a revenue collection edit and error listing. |
x |
|
|
|
|
x |
|
Suite |
RC Lock Box |
The ability to add a revenue collection lock box. |
x |
x |
|
|
|
|
|
Suite |
RC Process Manager |
The ability to view revenue collection process manager. |
x |
|
|
|
x |
|
|
Suite |
RC Receipt |
The ability to create and use a revenue collection receipt. |
x |
x |
x |
x |
x |
|
|
Suite |
RC Receipt Print |
The ability to print a revenue collection receipt. |
x |
|
|
|
|
x |
|
Suite |
RC Receipt Reprint |
The ability to reprint a revenue collection receipt. |
x |
|
|
|
|
x |
|
Suite |
RC Slip Receipt Print |
The ability to print a revenue collection slip receipt. |
x |
|
|
|
|
x |
|
Suite |
RC Station Master File Listing |
The ability to print a revenue collection station master file listing. |
x |
|
|
|
|
x |
|
Suite |
Void/Unvoid Receipt Batch |
The ability to void/unvoid a revenue collection receipt batch. |
x |
|
x |
|
|
|
Documents and Notes
|
App |
Component |
Description |
All |
Add |
Change |
Delete |
View/Use |
|
Checkout |
Undo |
Finalize |
Reminder |
|---|---|---|---|---|---|---|---|---|---|---|---|---|
|
FM |
Receipt Batch Documents |
Ability to add, view and work with documents in RC. Any user attaching documents to the batch will need this permission. Despite the availability of a “Change” permission, document attachments cannot be changed. |
ü |
ü |
ü |
ü |
ü |
ü |
ü |
ü |
ü |
ü |
|
FM |
Receipt Batch Notes |
Ability to add Notes in revenue collections. Any user attaching notes to the batch will need this permission. |
ü |
ü |
ü |
ü |
ü |
ü |
ü |
|
|
|
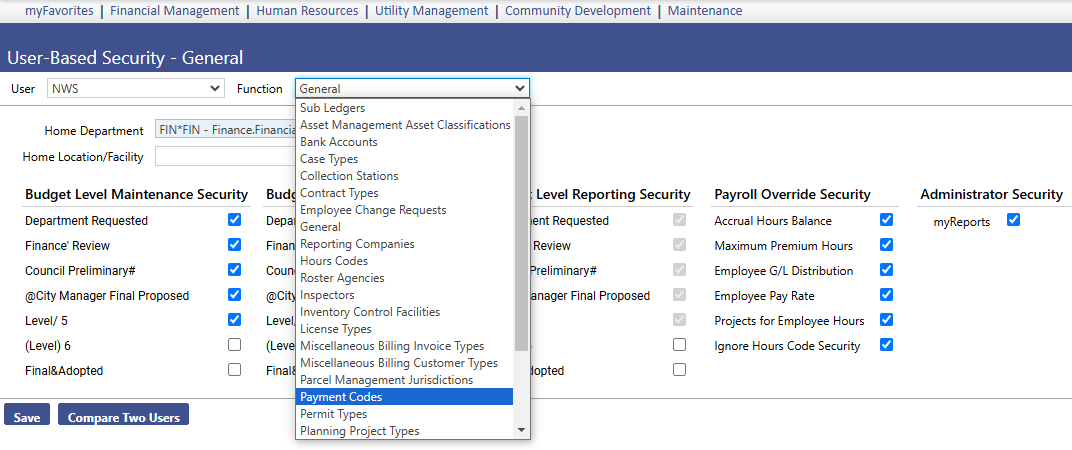
User-Based Security
Payment Codes: The Payment Code(s), which were previously created, need to be assigned to the appropriate users that will be entering Receipts. A user will only be able to create receipt batches for the Payment Codes that have been assigned to them.
Revenue Collections Sub-ledger: Determine what users will have supervisor privileges and budget override capabilities. In addition, select the G/L Organization sets each user will be able to enter purchase orders against.
Process Manager
Map out desired approval process for all departments and users for the following New World Processes which will be utilized in the system:
Revenue Collections - Revenue Entry: This process governs Purchase Order Entry. Define the workflow approvals for purchasing entry for all departments. Then assign the users to appropriate departments and levels where they will reside.
Revenue Collections – Inquiry: This process governs Revenue Collections Inquiry access. Assign departments that will have receipts entered against them, and assign the users to the departments they are allowed to inquire purchase order information on.
End User Processing Guide
Receipt Batch List
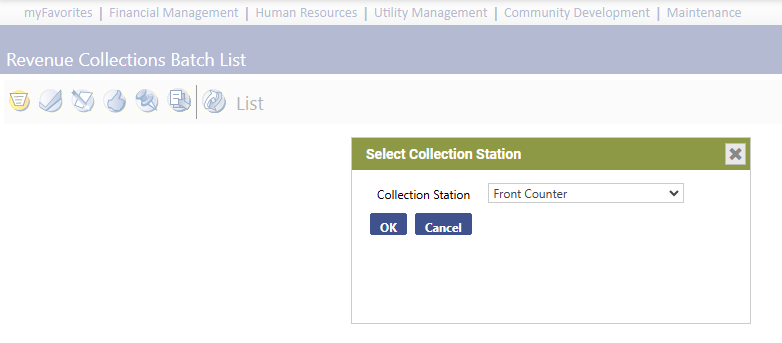
The following screen appears. A pop-up screen may also appear which asks the user to select a collection station. After the collection station is selected, a listing of all open revenue collection batches will appear. An open batch is one that has not been posted. Click the New button to create a new revenue collection batch.
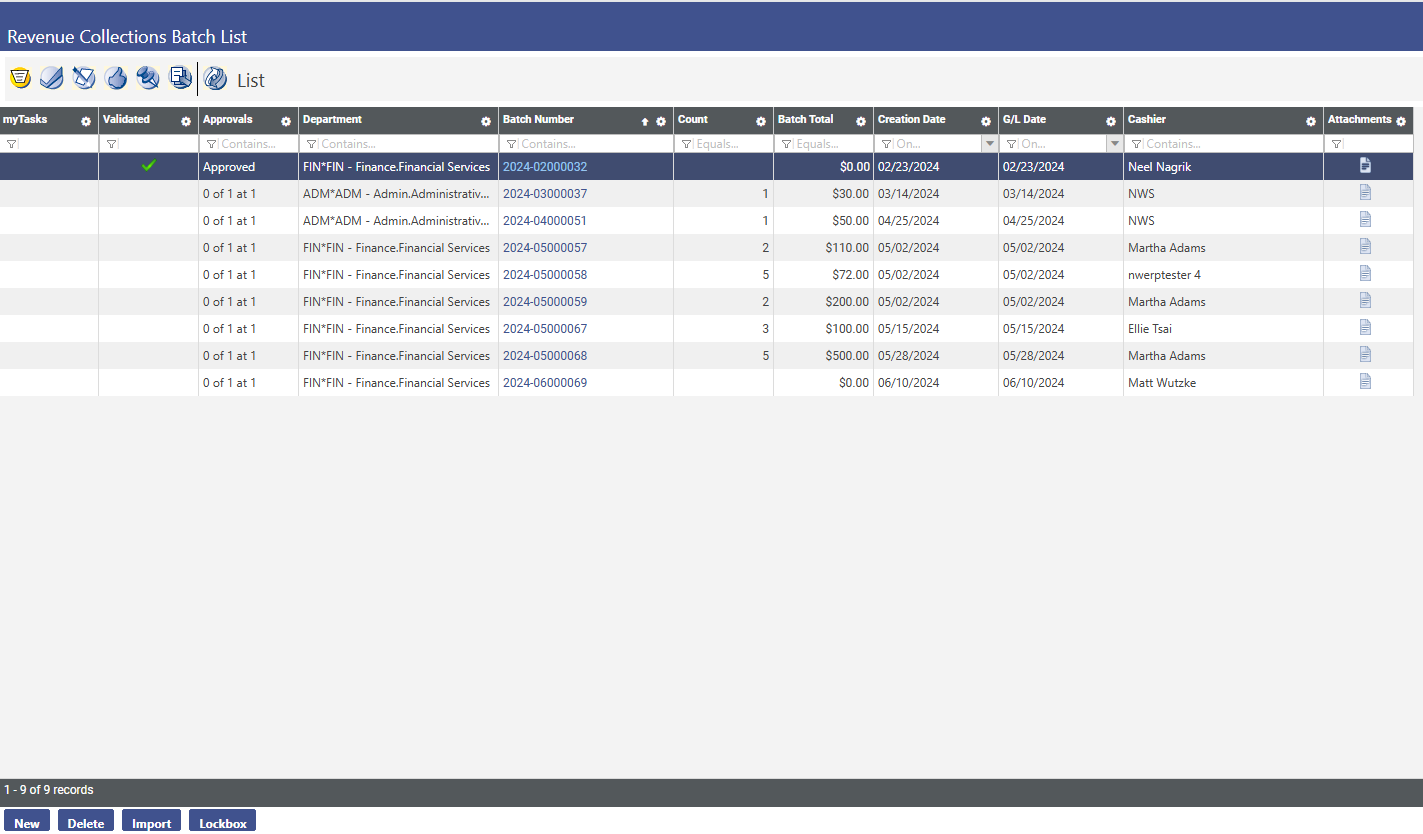
This Receipt Batch List screen shows all edit mode receipt batches being created. Depending on how security is configured, a user may have the option to only see the batches that they created, or all of the receipt batches within the departments they are assigned to. The list screen gives basic information about the batch. Receipt batches can be opened by clicking on the batch number. In addition, batches in the list can be sorted by clicking on the various column headers.
Clicking the new button will take the user to the Revenue Collection Defaults screen. Here, the user will enter the information that the user want to default on every receipt until a change is made to the defaults. The defaults screen should look like the screen below. After entering the defaults, click the save button.
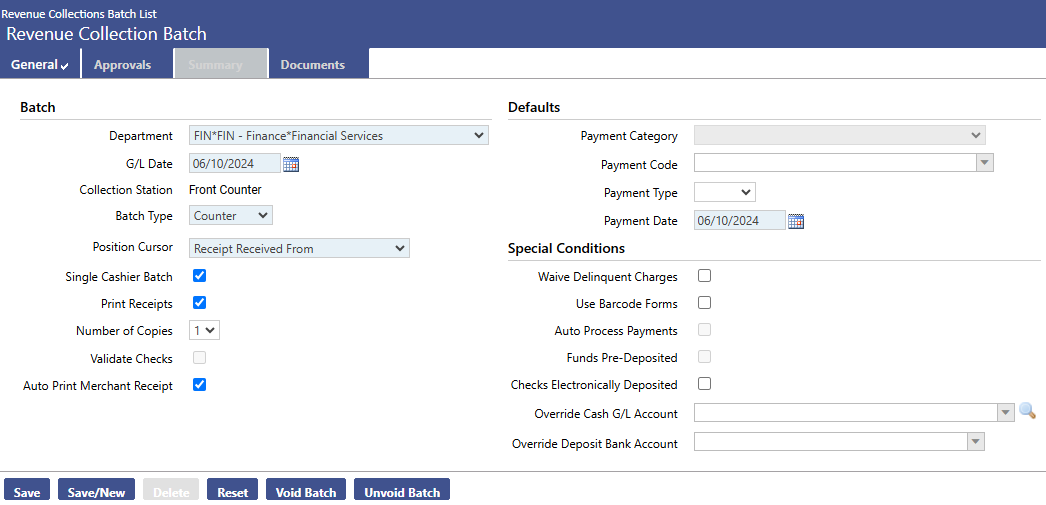
Revenue Collection Defaults
Department: Select the department that will be entering receipts. This is typically the Finance or Treasury Department. This is a required field
G/L Date: Defaults to today’s date. If the G/L date should be any other date, make the change to the G/L date field.
Collection Station: This will show the collection station associated with the receipts being created.
Batch Type:
Deposit: Deposit batches are used when receipts are created with multiple payment codes. This will allow for quick entry of receipts with multiple payment codes of the same payment category. For example, if the payment category is taxes, the receipt screen will show all of the different tax payment codes on the same screen. Selecting Deposit as the Batch Type makes Payment Category a required field.
Counter: This Batch type is used when a customer comes to the counter to pay for a bill. It allows for a quick entry of a receipt, and will automatically print a receipt if the print receipts check box is checked.
Back Office: With a back office batch there are no customers. Payments usually come in the mail, in the form of a check. Typically, no receipt is generated.
Position Curser: This will default what field the curser will start on the receipt entry screen.
Single Cashier Batch: If the “Allow multiple users in one batch” checkbox is unchecked in Company Suite settings, this will default as checked. This indicates whether multiple cashiers will be entering receipts for this batch.
Print Receipts: If receipts should automatically be printed after saving the receipt, check this box. Receipts will be printed to the printer selected on the collection station setup page.
Number of Copies: This is the number of receipt copies that should be printed if the “Print Receipts” check box is checked.
Validate Checks: This is used if the user is using a slip printer. This control indicates whether checks will be validated at the register.
Payment Category: This is a required field if “Deposit” is the Batch type. Payment Categories are validation set #54. All of the payment codes for the category selected will show up on the receipt entry screen.
Payment Code: If all receipts being entered are for one payment code, the user can select the payment code to default on the receipt entry screen.
Payment Type: Choices are Cash, Check, Charge, or Other. If all receipts being entered are for one payment type, select that here.
Payment Date: This date will default to today’s date. If a day other than today should be recorded as the payment date, select that here.
Special Conditions:
Wave Delinquent Charges: Enabled if the Batch Type is Deposit, this control signifies whether delinquent late fees associated with the accounts receivable sub ledger (e.g. Miscellaneous Billing or Utility Management) will be included (waive is deselected) or excluded (waive is selected) when calculating the current amount owed for the customer, invoice, or billing. This control is deselected by default.
Use Barcode Forms: Enabled if the Batch Type is Deposit, this control signifies that bar code scanners will be used to scan customer, invoice, or billing information. It is deselected by default.
Auto-Process Payments: Enabled if the Batch Type is Back Office, this control signifies whether user intervention is required to advance from receipt to receipt (Auto Process Payment is deselected) or, if after the bar coded information is processed, the transaction is automatically saved and the page is redisplayed in ADD mode ready for the next entry (Auto Process Payment is selected). This control is deselected by default.
Funds Pre-Deposited: Enabled if the Batch Type is Deposit, this control signifies whether funds for the transaction have already been deposited. If yes, transactions with pre-deposited funds will not appear on the Bank Deposit edit reports. This control is deselected by default.
Override Cash Account: This is used to override the Debit account for all receipts in this batch.
Override Bank Account: This is used to override the bank account for all receipts in this batch.
Save: Will Save the batch defaults and open the “New” button for entering a new receipt
Save/New: Will save the batch defaults and will create a new receipt batch with new defaults.
Delete: This will delete this receipt batch.
Reset: This will reset the screen to how it appeared when it was last opened.
Entering a Deposit Receipt
Once we have saved the batch defaults the new button should appear at the bottom of the screen. Click new to open up the receipt entry page. If the Deposit Batch Type is selected, the receipt entry screen should look like the one below.
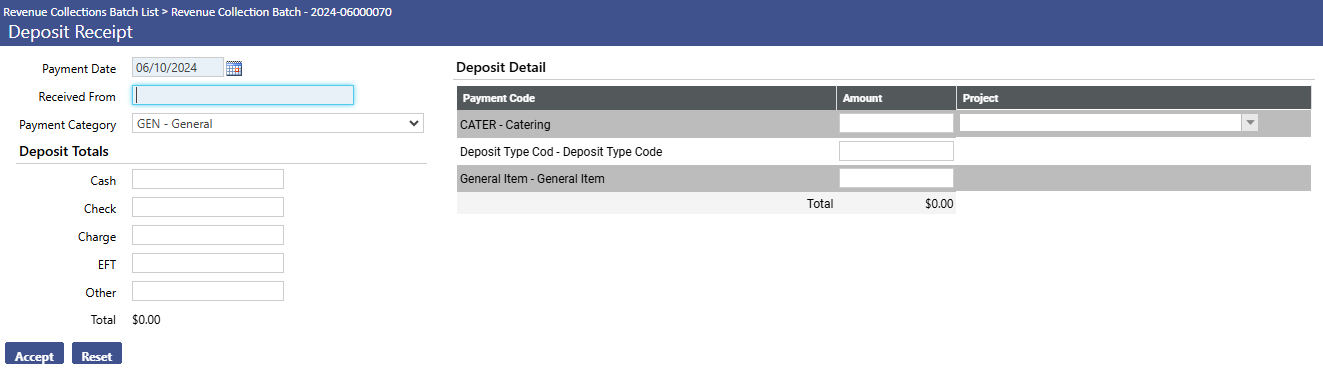
All of the defaults set up on the previous screen will show up on this screen. The Payment Codes associated with the defaulted payment category are on the right side of the screen.
Payment Date: Defaulted from the previous screen, this date will default to today’s date. If a day other than today should be recorded as the payment date, change that here.
Received From: Enter the name of the payee in this field.
Payment Category: This is the payment category selected on the previous screen. If a receipt is being entered for a different category, select it from the drop-down. This will change the payment codes on the right side of the screen.
Deposit Totals: Enter the total amounts of Cash, Checks, Charges, and Other Payments. The total here MUST equal the total of all of the payment code totals. The system will not allow the user to save the receipt until the totals of these two are equal.
Deposit Detail: The deposit detail shows a list of all payment codes associated with this payment type.
Project: If this revenue is associated with a specific project, select the project in the drop-down.
Total: Enter the receipt total for each of the payment codes. Again, this must equal the Deposit Totals section.
Accept: Once the user has entered all of the payments for this receipt, click the accept button to process the receipt. The user will get a message that asks if the user would like to Continue and process additional receipts, or Finish and return to the receipt batch screen. The screen will look like the one below.
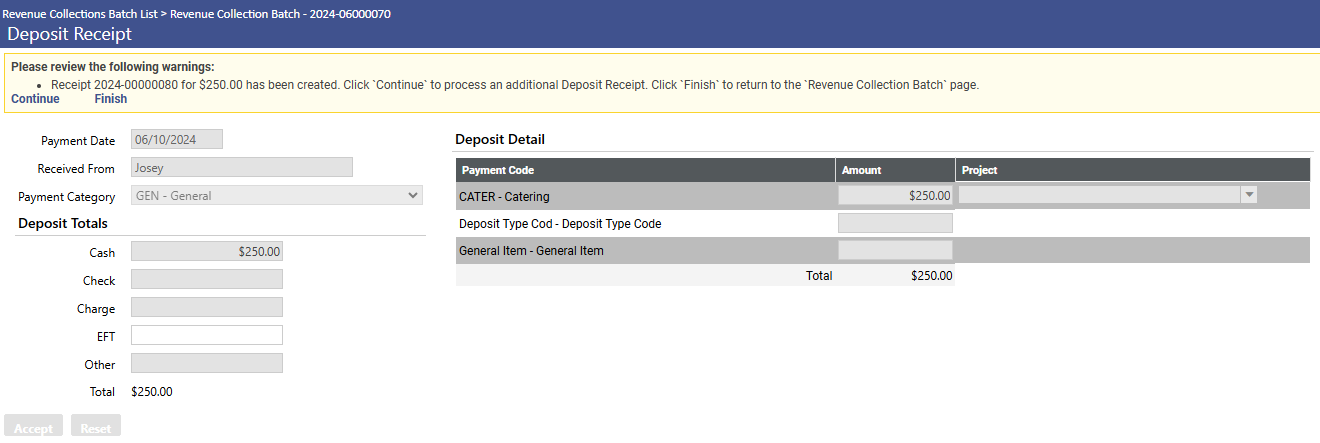
If the user is finished entering receipts, click the Finish button to save this receipt, and return to the payment batch screen. If the user would like to add another receipt, press the continue button.
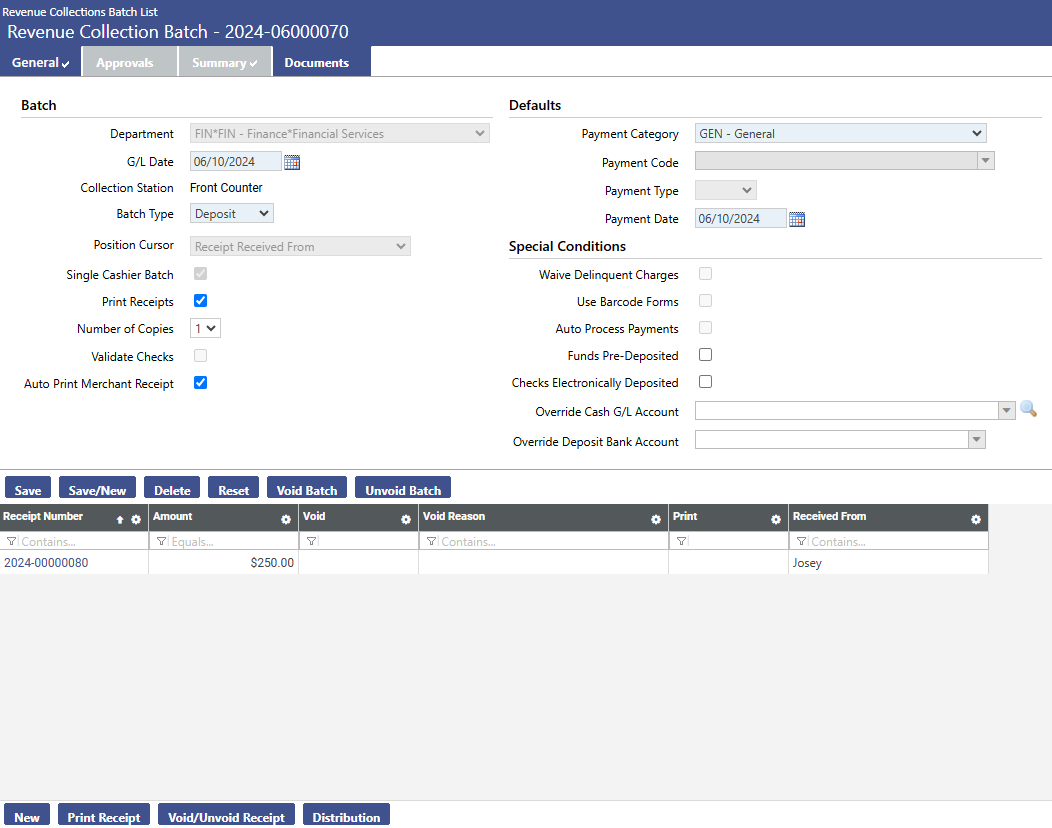
Once the “Finish” button has been clicked, the user will return to the Payment Batch screen. At the bottom of the screen, the user can see all of the receipts that have been entered for this batch. The screen will look like the one below.
Entering a Counter Receipt
The entry screen for entering a counter receipt will look the same as the entry screen for a counter receipt. Again, counter receipts would be used if no customer is present. If a check is received in the mail, and no receipt is printed, then a counter receipt can be used.
The receipts appear at the bottom of the screen. In order to print one of these receipts, highlight the receipt, and click the “print” button.
We will now create a Counter Receipt. If we change the Batch Type to “Counter” and save the new batch defaults, the Receipt Entry screen will change to the Counter defaults. After changing the Batch Type, click new to create a Counter Batch. The screen should look like the one below.
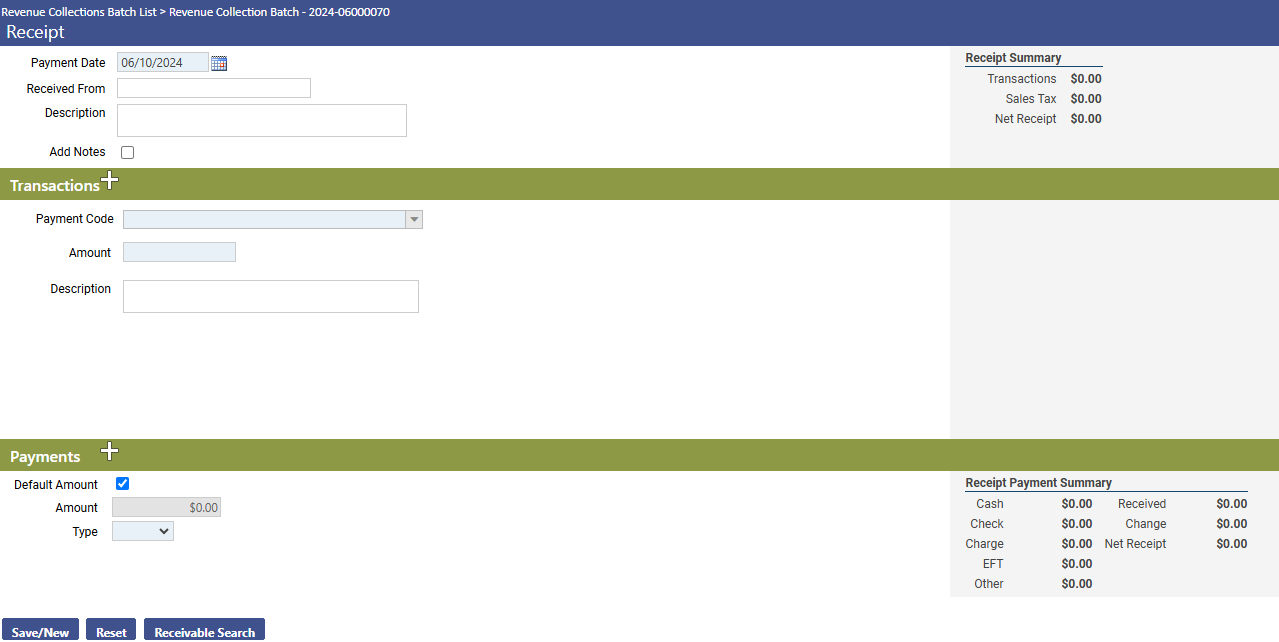
Payment Date: Defaulted from the previous screen, this date will default to today’s date. If a day other than today should be recorded as the payment date, change that here.
Received From: Enter who the receipt is from, and a description if desired.
Payment Code: Select the Payment Code for this receipt from the drop-down. This is a required field.
Amount: Enter the receipt amount in this field. This is a required field.
Description: If further information about the payment is needed, enter that information here.
Default Amount: If the full amount is being paid for with one payment type, checking this will automatically fill in the Amount field with the receipt amount. This check box is checked by default.
Amount: Enter the amount for this payment type.
Payment Type: Enter the type of payment that this receipt is for. (Cash, Check Charge, or Other)
The entry screen for entering a back office receipt will look the same as the entry screen for a counter receipt. Again, back office receipts would be used if no customer is present. If a check is received in the mail, and no receipt is printed, then a back office receipt can be used.
After the user is finished entering counter receipts, select the “save/new” button. If the Print Receipts check box was checked on the defaults screen, a receipt should print at the default printer. Use the “Breadcrumb” to return to the Receipt Batch Screen. The Breadcrumb can be found in the upper left hand corner of the screen. If the breadcrumb is clicked for the Revenue Collection Batch number, it will return to the Revenue Collection Batch.
Additional receipts can be added if desired, or select the “Revenue Batch List” Breadcrumb to return to the Revenue Batch List screen.
Receipt Batch Processing – Workflow
Once the receipts have been entered, they need to be taken thru the workflow buttons shown on the Receipt Batch List screen. The List icon is the first icon, and it shows the status and other information related to each batch. The various columns are described below.
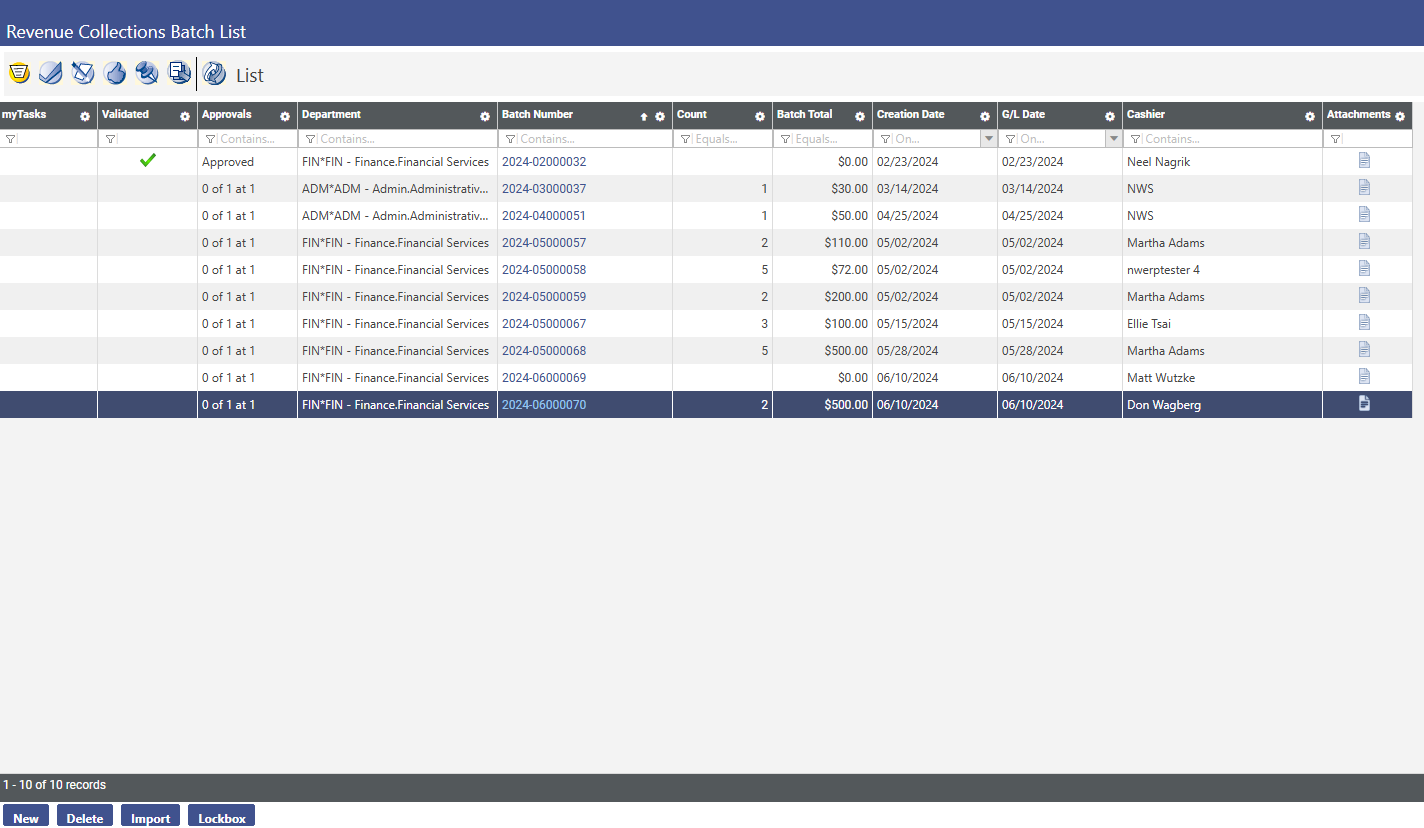
Follow the steps at the top of the screen in order to Post this Receipt Batch. In Order to Post, validate, print the edit and error listing, have the necessary users approve the batch, and then post the batch to create a journal entry.
myTasks: A green checkmark in this column indicates that a revenue collections batch is waiting for that user’s approval.
Validated: A green checkmark in this column indicates that a batch has successfully completed a validation.
Approvals: Shows the current approval status of a revenue collections batch.
Department: Lists the Functional Department under which a batch was created.
Batch Number: Lists the revenue collections batch number.
Count: Indicates the number of receipts in the batch.
Batch Total: Calculates the total amount for all of the receipts in the batch.
Creation Date: Indicates when the batch was created.
Cashier: Lists the user who created this batch.
Validation
Click on the check box at the top to move to the validation screen. The screen will look like the one below.
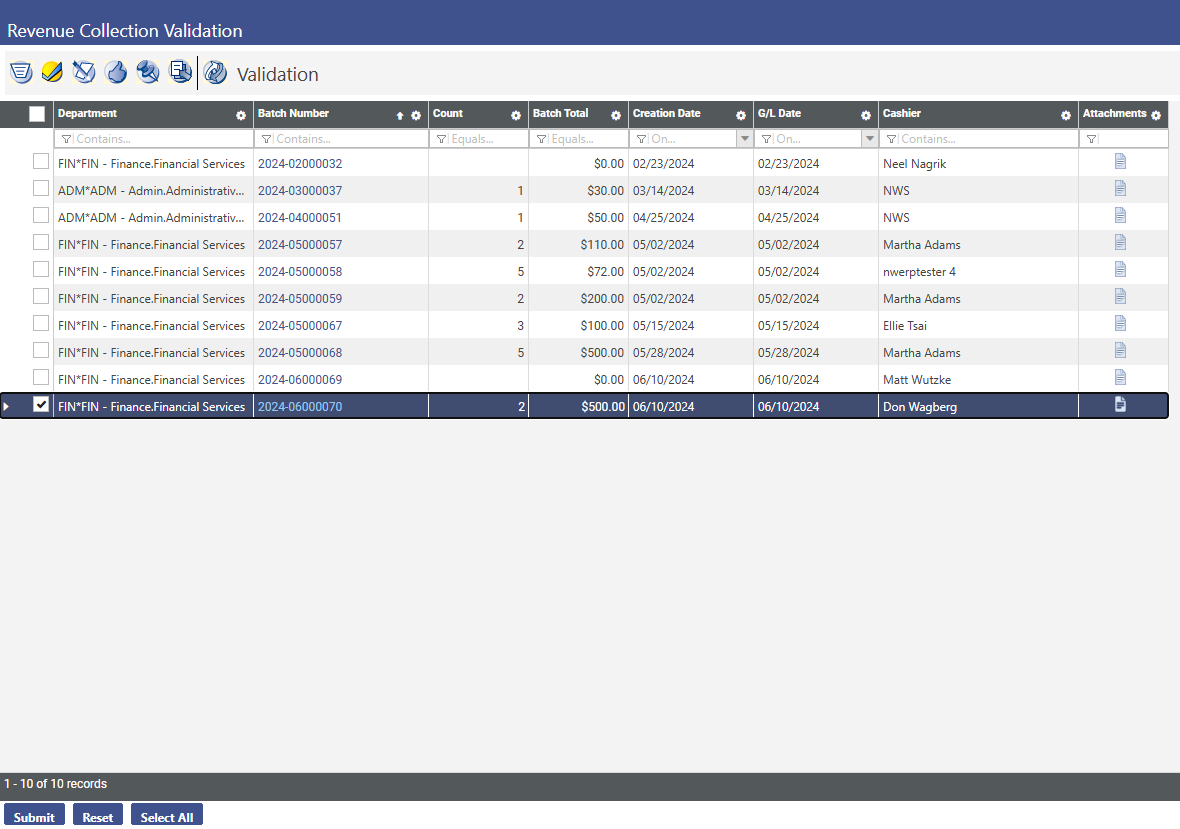
Check the checkbox next to each of the receipt batches that the user wishes to validate. The validation process checks the receipt to ensure that there are no problems. Once the user have selected the receipt batch, click the submit button. This will check for errors, and show the user the validation results at the bottom of the screen. If the validation is valid, the user may move on to print the edit and error listing.
Click the Print Edit & Error Listing icon to move to the print edit and error listing page. The screen will look like the one below.
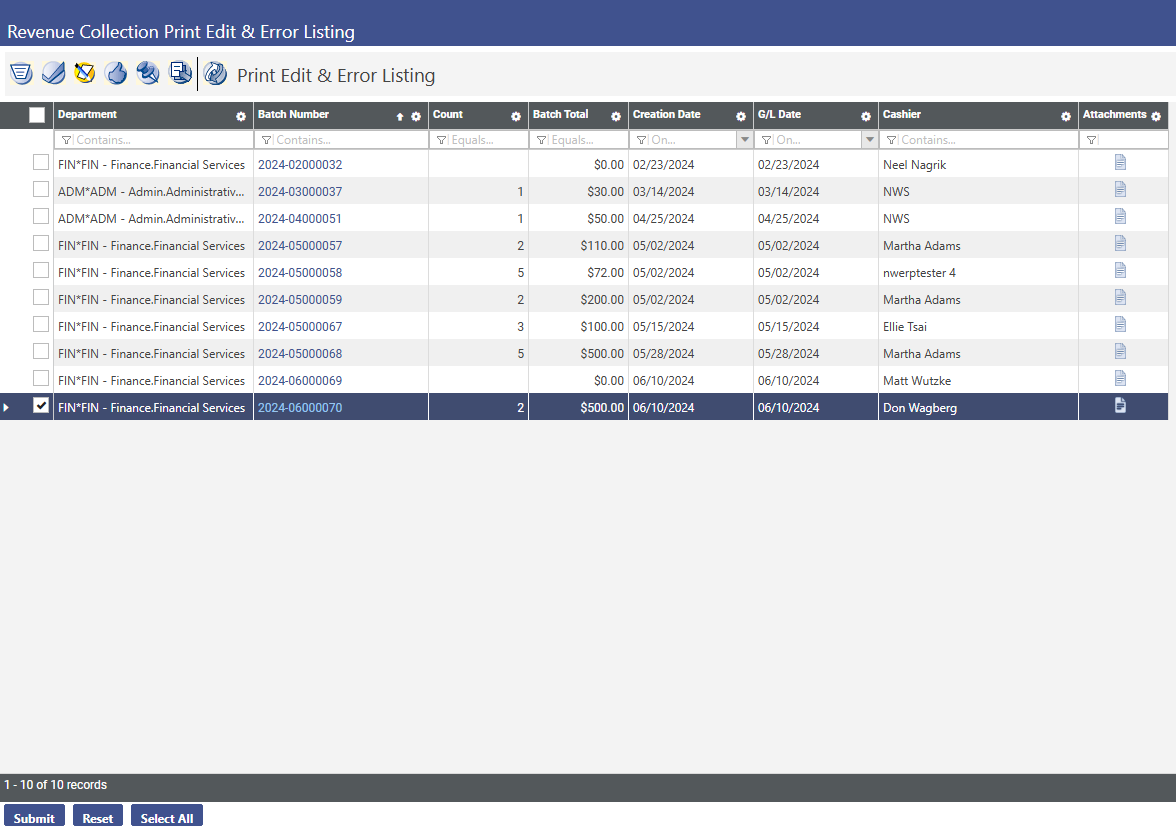
The Print Edit and Error Listing page will send the edit and error reports to the user’s myReports page.
Edit Listing: The edit listing will show the information that the user select in the Show Preferences icon. This is found in the upper right corner of the screen.
Error Listing: If any errors exist in the receipt batch that prevent the batch from validating, an error listing will print that will show the user the details of these errors. This listing will also show up in the user myReports page.
Once the user have selected the user batch, click the submit button to print these listings. The user may now click the Approval icon to approve the batch. The screen will look like the one below.
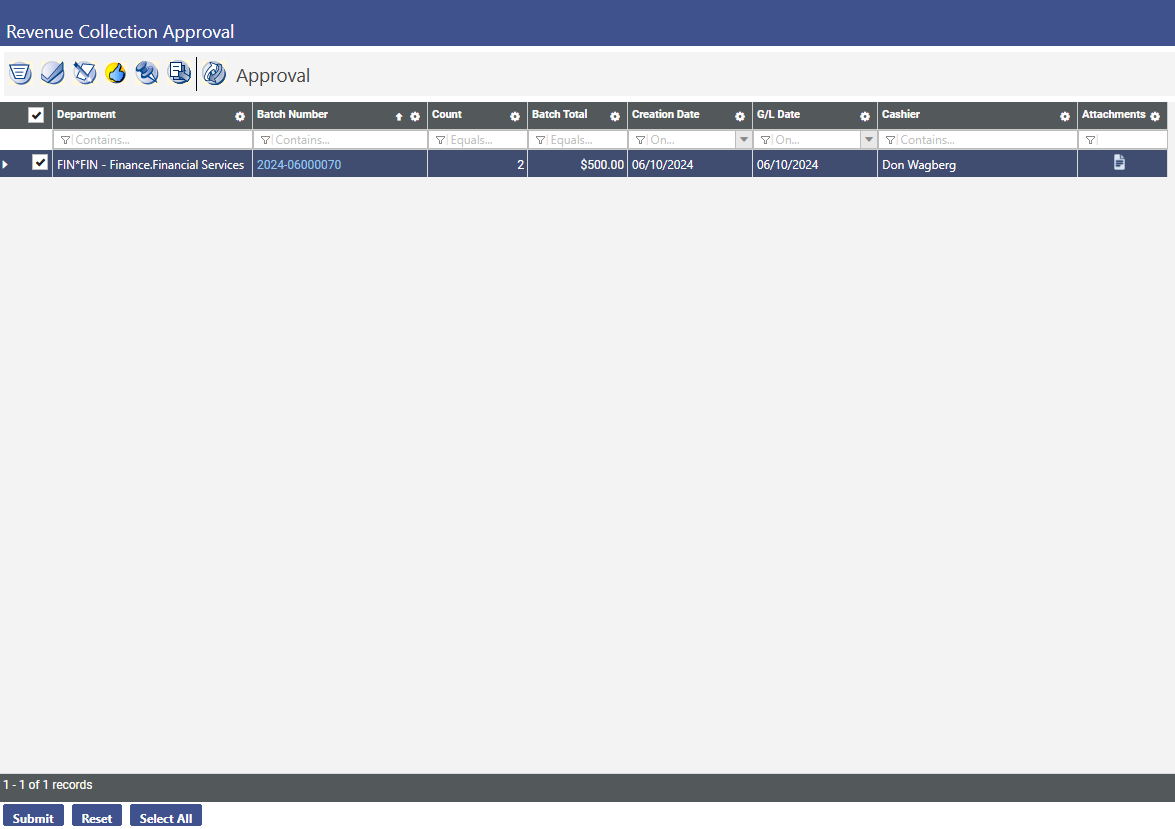
The Approval screen will show only the Receipt Batches that have already been validated. Check the box next to the batch that the user wish to validate, and click submit. If the user is the final approval level in the process, the user will be able to move on to the post screen. If another user must approve the batch before it can be posted, a message will appear in that users “MyTasks” screen alerting them that they have a receipt batch to view and approve. Click the Post icon to move to the Post screen. It will look like the screen below.
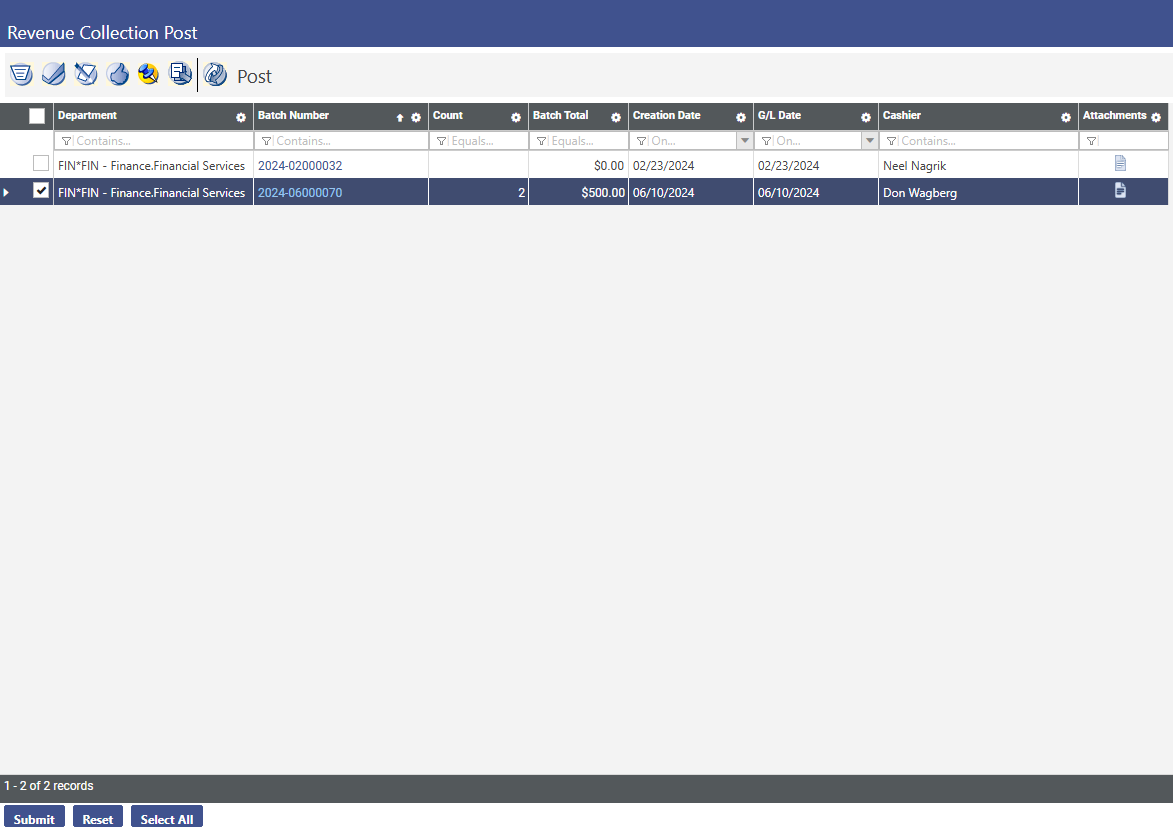
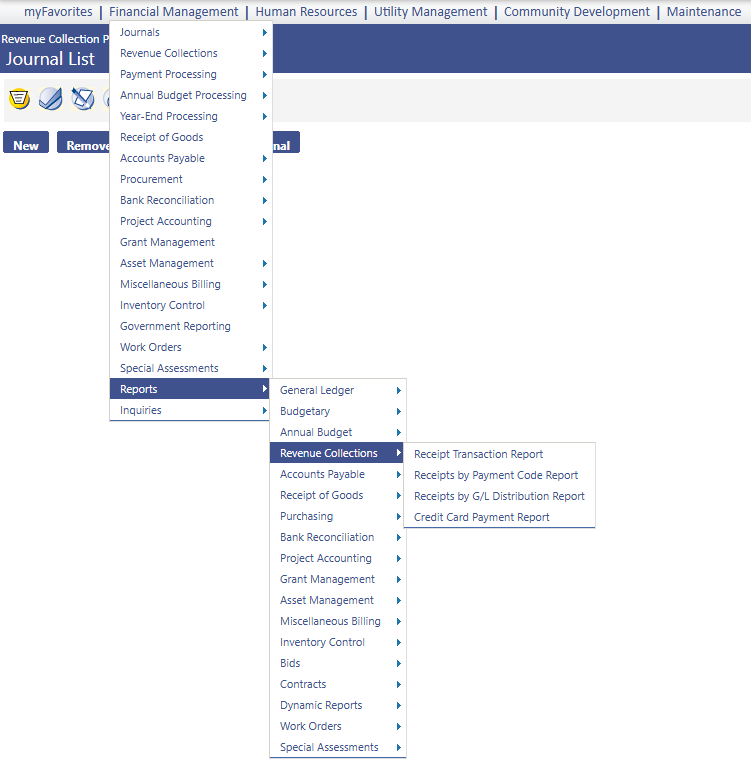
Only the Receipt Batches that have been fully approved will show in the Post Listing. Check the box next to the receipt the user wishes to post and click the Submit button. This will create a Revenue Collection Payment Journal Entry on the journal entry screen. To view the Journal Entry, click the Journal List button. From here, the user can view the entry, or follow the workflow buttons at the top of the screen to post the Journal Entry to the General Ledger.
Journal List Shortcut
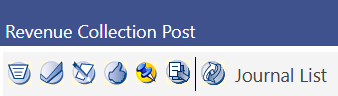
Certain users may also have access to the last icon on the revenue collections screen called Journal List. Pressing this icon simply transports a user to the Journal List screen where they may want to process and post the journal which was created as a result of posting the receipt batch.
*If the user is using the Bank Reconciliation module, then the receipt batch does not go to the journal list. It is transferred into a Receipt Deposit Batch in the Bank Reconciliation Module.
Revenue Collections Reports
Revenue Collections reports can be found by navigating to Financial Management > Reports > Revenue Collections.
Receipt Transaction Report
To execute the report, navigate to Financial Management > Reports > Revenue Collections > Receipt Transaction Report.
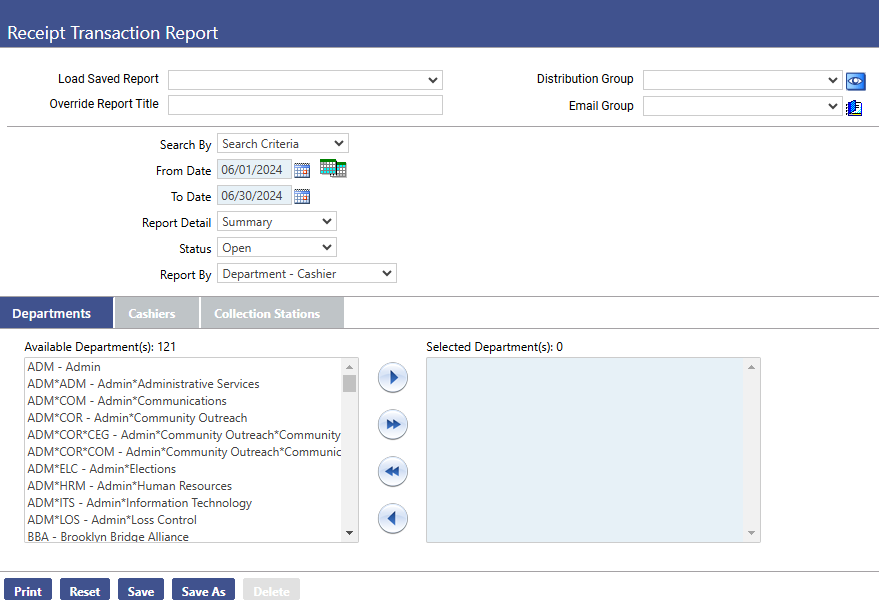
Report Selection Criteria:
Search By: Select either the search criteria or the single receipt batch
From Date: Select the from date in the calendar or by typing into the box
To Date: Select the to date in the calendar or by typing into the box
Report Detail: Select either summary or detail, depending on how much information the user needs on the report
Status: Select whether to narrow down the position of the receipt batch, or select all
Report By: This is a sorting mechanism show reflects on the report
After the user selects the criteria, at least one department, cashier, and collection station must be brought over in order to generate the report. To generate, click the “Print” button on the bottom left of the page.
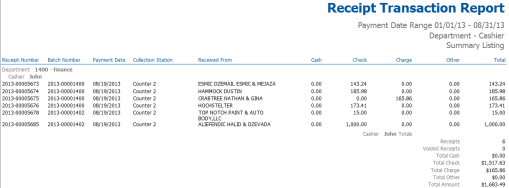
Receipt Transaction Report: This report will show the receipt number, batch number, payment date, collection station, payee, and payment type by cashier. This report will be helpful to find specific details about the amount of money that was taken in by different cashiers
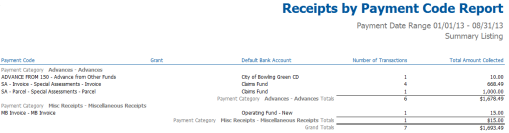
Receipts by Payment Code Report: This report will show the payment code by payment category, grant information (if applicable), bank account, number of transactions, and the total amount of money recorded for each payment code.
Receipts by G/L Distribution Report: This report will show the general ledger account by fund, the G/L date, number of transactions, and the debit and credit amounts for a specific period of time.
